Creating a Game Room: Part 19 - So Long, Temporary Solutions!
It's time to class up the joint
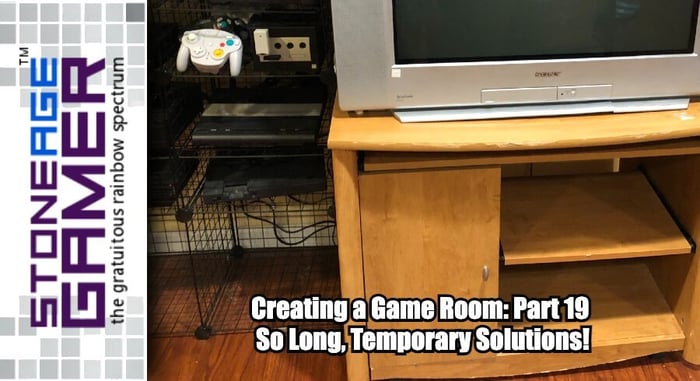
With the games all nice and cozy on their shelves (and the rest of them still boxed in the closet) it’s time to turn my attention to my consoles. Do you remember this setup?

It’s been a while since I made it, but I put quite a lot of effort into making it functional. However, there’s no denying that this is far from an attractive solution. No matter how I try to tie up the wires in the back, it’s still a bunch of wonky, wobbly wire shelves, and it looks like a DIY project.
It was never meant to be a long-term solution, and now it’s time to figure out how to replace it.
What’s up here is what I want on display for the most part, though it would be nice if I could get a few more consoles out and about. But in order to see if that’s at all possible, I was going to have to figure out exactly what kind of shelving I was going to use.
No more wire shelving
I wanted to keep things IKEA so it remained more or less uniform with the game shelves standing a few feet away, and the KALLAX cube shelves seemed like my best option, if not for the fact that they’re cubes just like the wire shelves. I was able to rig more rectangular shelves with some zip ties and an extra set of shelves, but the KALLAX shelves wouldn’t be so easy, or so I thought.
Turns out IKEA sells a set of glass shelves for their KALLAX units that look perfect for my designs. Look at these things, they look super classy!

That picture is from IKEA's site, by the way, and these things took way longer to come back in stock that I would have liked.
Anyway, once the glass inserts were in my possession, it was time to build, and it turned out to be a MUCH easier process than I anticipated. I figured these glass shelves were going to involve me measuring out exactly where the halfway point was and there was no way I was going to be able to keep that uniform. Fortunately, IKEA actually had the perfect solution right there in the packaging. They included these neat little cardboard markers to use for drilling the holes exactly halfway up a KALLAX shelf. You could also turn it sideways if you wanted to put 2 of these glass shelves in one box shelf area, but that would be way too small for any of my consoles.
Anyway, once that was done, I was very pleased with the look. I knew these were going to be an improvement, but I wasn’t quite prepared for just how much better this was going to look.
A new home for my TV
With this all put together, it was almost time to decide which consoles were going to go where. I could already tell my Master System was going to be a problem, but there was one more area that needed my attention before ultimately deciding what was going to go where.

Remember this big fella? Found it at a thrift store for a couple of bucks, and it’s been serving me well ever since. However, with these nice new IKEA shelves, this beat up old thing sticks out like a sore thumb, so it’s time to decide exactly what to do about that.
My first thought was to try and find a replacement. That didn’t go too well. Turns out not a lot of people are making nice quality TV stands with massive CRTs in mind anymore. Who knew?
There was a fantastic TV stand that was built specifically with this kind of TV in mind that I bought with the TV back in the old days, but unfortunately that thing is long gone, and nobody around me is selling one secondhand. Also, that stand was silver like my TV, and I’m really going for a black motif here.
The next thought I had was to see if I could possibly clean up the current stand in an effort to make it work with the new stuff. It’s a pretty great setup after all. It just needs to look nicer.
After a little internet research, it was brought to my attention that Home Depot’s BEHR Ultra Black Mocha Satin paint is supposedly a darn near perfect match for IKEA black/brown. So I went out and bought a gallon because clearly I have no idea how much paint I should buy for a project this size. (spoiler: I bought WAY too much paint).

Painting project
The first step in this process was cleaning this thing up to the best of my ability. It’s got some pretty serious issues, including some apparent water damage in the back, and some peeling surfaces along the front. I got out some sandpaper and Goo Gone and did the very best I could. This isn’t exactly a high quality item here, so sandpaper didn’t go as well as it could have. It seems like it’s some cheap wood covered in a sort of contact paper to give the illusion of a wood finish, so whenever I sanded instead of things getting smoothed out, it would just tear more of that surface layer off, but I’m assuming that as long as I paint it all black the issues shouldn’t be quite so obvious.
The next step was deciding how much of it I wanted to take apart. Obviously removing as much as possible would result in a higher quality paint job, but given the fact that this thing isn’t exactly made out of the highest quality materials (and it seems like it’s been repaired at least once before), I decided the main structures should remain intact. Also, a lot of it will be covered by a door, so I really only need to get in there and paint the areas that will be seen.
I took out the shelves and removed all the metal components so I could just cover the wood.
Once I had it all laid out, I cracked open the paint can and was immediately filled with doubt. This paint really doesn’t look like IKEA black/brown. But paint can usually look different when it dries, so I'll have some faith.

Or at least I thought I would until I started actually painting. This stuff looks nothing like I was hoping it would. But it’s what I have, so the heck with it. Let’s just see how it all turns out. Even if it comes out as poorly as I imagined, it would still be an improvement over what I had going on before.
Boy do I love being wrong. This stuff dried out brilliantly. I don’t think I’ve ever seen paint change colors this much when it dries. It isn’t a 100% perfect match, but the internet was right, it’s shockingly close. Well done, internet!

Painting all the hard to reach parts was a bit of a challenge, but the desired effect of mostly hiding the blemishes worked like a charm. It isn’t perfect, but the finished product is really impressive looking!
Once the paint dried, I got it all put back together and set it right next to my new KALLAX shelves. Now that it’s been painted, I’m declaring it no longer a storage unit for my kids’ toys. It’s time to decide which consoles will stay, and which ones will go… back into the closet. I’m a hoarder, after all. I’d never actually get rid of any of my systems!
The Game Room story so far:
Creating a Game Room: Part 18 - And Everything Inbetween
Creating a Game Room: Part 17 - Atari to Xbox
Creating a Game Room: Part 16 - Making Nintendo Look Good
Creating a Game Room: Part 15 - Overdoing it on Organizing
Creating a Game Room: Part 14 - At Long Last, SHELVES
Creating a Game Room: Part 13 - Adventures in Consolidation
Creating a Game Room: Part 12 - On the Blink
Creating a Game Room: Part 11 - Reclamation at Last
Creating a Game Room: Part 10 - Paint it Black
Creating a Game Room: Part 9 - Inspiration From Above
Creating a Game Room: Part 8 - A Nice Place to Sit
Creating a Game Room: Part 7 - Two Steps Forward…
Creating a Game Room: Part 6 - Love (HDMI) Connection
Creating a Game Room: Part 5 - CRTs are Heavy
Creating a Game Room: Part 4 - Arcade Dreams
Creating a Game Room: Part 3 - Shelf-Satisfaction