Creating a Game Room: Part 12 - On the Blink
At first glance, you’d be forgiven if you thought I didn’t actually do anything to my game room setup since last time. But I did plenty, thank you very much! Not only that, but I did one thing in particular that I’ve been wanting to do for AGES.
In the last episode (is episode the right word?) I mentioned that I needed a new cable for my Master System. I actually needed a few other things too while I was at it, so I placed a fun little order from Stone Age Gamer for a new Master System AV, a pair of controller extensions for NES, and a shiny new 72 pin connector for my ancient NES. I’d never replaced a pin connector before, but I’d always heard it was a relatively painless process that didn’t actually involve any soldering or anything like that. So I went for it. When I initially finished setting all my consoles up, I couldn’t get my front loader NES to stop blinking and read my EverDrive N8 at all, and I thought a fresh pin connector would handle that problem nicely. I knew the issue wasn’t the EverDrive because it works flawlessly in my top loader. But I don’t want to use my top loader because 1. It takes up too much vertical space when there’s a cart in it, 2. It always displays these weird vertical line artifacts when I play it. It’s been that way since I got the thing when it launched, and I’m 90% certain I’m not alone, and 3. It doesn’t connect via AV, and I’m not going RF unless I absolutely have to these days.
Even though I had a feeling the pin connector repair wasn’t going to be complicated, I assumed it was going to take some time, so first I decided to tackle replacing my Master System AV and try out my new controller extensions. (That reminds me, I have to order some GameCube and SNES extensions!) That process was pretty simple, and the new AV cable made my Master System boot up like a champ. Seriously, the Master System boot screen is one of my favorite things of all time.

Anyway, the reason I’m even bothering to write about replacing a cable is that as I was looking at the NES controller extension, I was stricken with an idea. Something that’s been bothering me about my setup since I finished putting it together is the cables. The wire racks are doing a great job housing my consoles, but you can see every single dangling wire in perfect clarity no matter where you’re sitting. So as I’m unwrapping my shiny new wires, what do I see? BLACK TWISTY TIES! All of a sudden it struck me, I can use these twisty ties to clean up my wires!
Since I already had my setup pulled away from the wall to replace the SMS cable, I climbed back behind it and got to work cleaning up the rats nest I had created. The wire racks being black certainly helped show off the dangling wires when they were all just hanging there against my yellow-ish wall, but they also do a great job of camouflaging the cords when they’re all tied up. I grabbed each set and lined them up along the bottom of each shelf, then tied them at the end so they could go straight down and head over to the back of the TV. The result was fantastic, and far more malleable than using zip ties, which was my original idea. But now, when I eventually add the remaining systems to the bottom shelves, it will be super easy to wrap those cables up in the same bundle without having to cut a bunch of zip ties and risk me cutting important wires because I’m clumsy.

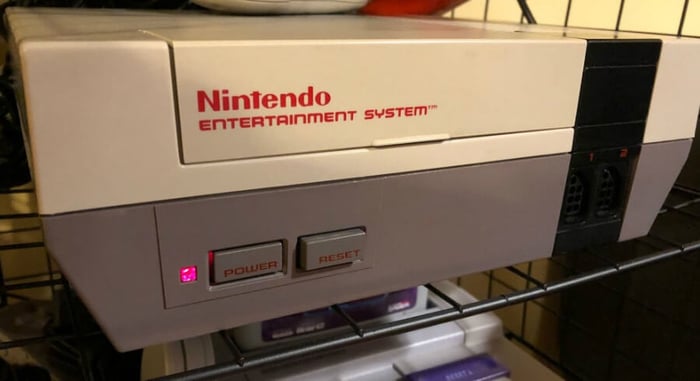
Now that that stuff was out of the way, it was time to perform some NES surgery. I grabbed my screw driver, my favorite front loader NES, some cleaning solution, and parked myself down to get to work. It’s been YEARS since I last opened up an NES, but it’s a pretty simple process. Regular old philips head screwdriver does the trick nicely. I opened it up, took all the shielding panel stuff off, removed the plastic game saddle springy thing, and got to the pin connector. I really thought there was going to be more to it than this, but there were no wires to disconnect or anything. The thing just slides off like a cartridge. While it was off I cleaned the contacts a bit, then I popped the new connector on, put all the screws in place, and headed downstairs to sit on my butt and play some NES games on my EverDrive.
Except I couldn’t.
When I turned my system on, it still blinked, and no matter how much I futzed with it, I couldn’t get it to stop. I figured I must have just screwed something up, or maybe there was a different issue entirely with the console. No problem. I have plenty of NES systems laying around. So I cracked open a second one and performed the same process. Put it all back together, connected it to the TV and blamo. Same problem. Okay, I must be missing something. But hey, it’s not like I have a shortage of NES systems. I can do this all night.

But just because I can, doesn’t mean I want to. So before I decided to rip apart my remaining systems, I jumped on the Stone Age Gamer Discord and asked my coworkers for some help. After all, they know a heck ton more about this kind of stuff than I do.
All around cool dude Andy was the one who actually sent me the stuff in the mail, so he tried walking me through a few basic steps like cleaning the contacts, but he was slightly mystified by why the thing was still blinking. But instead of trying to solve that mystery, he told me that I can stop the blinking entirely by disabling the lockout chip. To which I internally responded “whaaa???”
Something I didn’t know was that the blinking isn’t simply the NES saying “this game’s dirty and I can’t read it,” like I always thought. It’s actually more like “this game’s dirty, and I can’t tell where it’s from.” The blinking is directly related to the lockout chip. To use Andy’s words “It won't ever blink again after doing that, the blinking is always from a connection issue where it's not recognizing what region the game is because the pin connector is dirty.” I never knew that.

The pin connector was one thing, but disabling the lockout chip seemed like a bridge too far for me. I’m not super tech savvy when it comes to understanding chipsets and whatnot, but if this meant my system would never blink again, it would definitely be worth it. And if I messed up, it’s not like I’m short on NES systems to fall back on.
I looked up a YouTube tutorial on the process and got to work. Much to my surprise, it actually was a pretty straightforward process. The first thing I had to do was open everything back up, and actually go a step further with removing the board. I had to pick the board up from the system’s shell itself and turn the dang thing over. I did this once before when I was a kid back when I used to like taking systems apart and put them back together just to see if I could, but this time I was looking for something very specific. The lockout chip is the one that sits right above these 2 blue cylinder doodads. (Why yes, my technical jargon game is ON POINT) All you need to do is find the 4th connector in from the left and bend it away from the chip itself. Theoretically once you do that, the system won’t blink anymore. For whatever reason, bending this thing was way more tough than I expected it to be. The guy in the video bent his with little to no effort. Mine was starting to bend the little screwdriver I was using. Must have been a particularly strong connector in that system because I went ahead and did it to the second NES I still had taken apart and it bent away like butter. Weird.

I won’t say I wasn’t nervous, but I still felt like this was going to work. This time, I decided to test it out BEFORE putting the whole dang thing back together (something I highly recommend) and to my shock and relief, it worked like a charm! The EverDrive booted up with no issues at all and I can’t tell you how awesome that feeling is. Ever since I was a kid, some sort of blowing or blinking is just baseline expected every time I turn an NES on. That’s not the case anymore. I turn my NES on and boom, it starts up. It’s an amazing feeling.
So there we have it. My NES is fixed, my Master System works great, I’m collecting some extension cables to I can sit comfortably on my couch, and my little retro setup is working like a charm. Or so I thought.
The next morning, I was down in the basement playing some NES games, when my son came down to see what I was doing. I was just unwrapping my Zapper to play a quick game of Gumshoe when he saw the gun and asked to play some Duck Hunt. What kind of father would say no to a little Duck Hunt with his son? So we fired it up and he had a ball. Eventually his sister woke up and came down to play too, and we all crowded around the TV to shoot some ducks.

As fun as this was, I had also just gotten my Master System working, and I thought John would get a real kick out of Safari Hunt. Trouble was, none of my Master System games were accessible. Not without doing some serious digging. So spelunking I went. See, this is the biggest problem with my retro setup right now. I have an EverDrive N8 so I have access to all my NES games. I have an SD2SNES Pro so I have access to all my SNES games. But I also have a Nintendo 64, GameCube, Sega Master System, Sega Genesis CDX, Sega Saturn, and Sega Dreamcast hooked up to this TV, and all the games for said platforms are boxed away, crammed very tightly in that closet behind the pink castle tent in the picture above. Literally thousands of games with very little access to them. I obviously still can’t get them all out to display because that purple-shirted demon in the picture above would gleefully destroy them all the first chance she got. But fortunately for me, inspiration struck again.
As I was digging out my Master System games to show off Safari Hunt, I came across several boxes of what I would consider “non-essential” stuff. Boxes of video game-related things that I’ve collected over the years that’s cool, but not anything I need regular easy access to. A few weeks ago I had a garage sale and when I was going through all the random crap in my garage I came across an old DVD rack I still had for some reason, and it popped back into my mind as the perfect thing to use for an “essentials shelf.” If I could manage to clear out enough boxes, I could theoretically make room to put that rack in there and fill it with the games I’m most likely to want to try and play on those old systems. So I got to work clearing stuff out, separating what could be safely stored in the attic instead of the closet. The boxes for the consoles I had set up didn’t need to be there anymore, my box of miscellaneous bags and lanyards could move upstairs, that kind of stuff. The result was a great start.

In the interest of saving time at that moment because the kids wanted breakfast, I only got as far as this, but the idea I think is going to work like a charm. The games are behind the closet door, which I can prevent the kids from getting into pretty easily, so I can put just about anything I want on it without fear of it being destroyed by tiny hands. It’s sitting on top of a bin of controllers and components right now, but I’m pretty sure once I get a little more time to dive in, I can clear enough space to move that bin and have the shelf safely on the floor. I pulled some of the games up there now from boxes of random stuff that had been piling up over the last few years, and I even found a handful of VHS tapes, which immediately convinced me that I have to hook up my VCR to this TV so I can sit down and watch that Donkey Kong Country VHS tape I’ve been holding on to all these years. I also need to fill this shelf with all the Saturn, Master System, Genesis, Sega CD, Dreamcast, N64, and GameCube games I can.
No, it isn’t pretty, but it’s functional, and easily hidden. I’ll definitely post an update when I figure out which games I decide to put on there. But it’s just a stop gap for the next few years until the kids are old enough to be trusted around my games. So it doesn't necessarily have to be pretty.
Until next time!
The Game Room story so far:
Creating a Game Room: Part 11 - Reclamation at Last
Creating a Game Room: Part 10 - Paint it Black
Creating a Game Room: Part 9 - Inspiration From Above
Creating a Game Room: Part 8 - A Nice Place to Sit
Creating a Game Room: Part 7 - Two Steps Forward…
Creating a Game Room: Part 6 - Love (HDMI) Connection
Creating a Game Room: Part 5 - CRTs are Heavy
Creating a Game Room: Part 4 - Arcade Dreams
Creating a Game Room: Part 3 - Shelf-Satisfaction
Creating a Game Room: Part 2 - Organization is Key
Creating a Game Room: Part 1 - System Selector
NOTE: These older posts are missing their images. I’m working on getting that fixed as soon as I can!