Creating a Game Room: Part 21 - Decorating and Procrastinating
Making it look pretty
The next project is going to be very labor intensive, and I do love procrastination, so the next step I set my sights on was decorating! The big thing is the closet, which doesn’t have to be pretty, but does have to be efficient, and that’s going to take careful planning and work. But that’s all behind a closed door. I want what’s on the outside to look nice!
The thing is, it’s not just because I want to be able to sit in a cool room. I actually need this to look nice for work now. The impetus behind finally completing this project was that Stone Age Gamer has hired me to start creating video content for their YouTube channel, and I’m using my collection/game room as my “set.” So having my game room setup actually look nice is actually a necessity.
Library finesse
One thing I see a lot in YouTube videos is the “wall of games” behind whoever is speaking. I’ve always liked that in concept, but in execution it winds up looking very chaotic. I wanted my backdrop to look cool, but also clean so it wasn’t distracting. It’s also partially because I’m a nutcase as you can read all about in my previous posts, but at least I can take solace in the fact that there was a reason for my madness.
So with that all done, today’s post is all about adding finesse, and what to do to really tie this all together. First let’s go to the game shelves and these amiibo.
I wanted to do these first because I’ve already figured this out. From the get go I had planned to set up a series of amiibo on these shelves, and since I have a ton of the things filling them up wouldn’t be a problem.
But there still was a problem. What should go where? How many per shelf?
Who goes where?
Well, the easy part was making Mario front and center. I’ve always been a Nintendo nut, so getting my Mario stuff all grouped together was a no brainer. I initially thought 7 amiibo per shelf was a good look, but honestly, it still looked crowded.
Making something like this look good is a bit more challenging than it would seem. Put them too close together and it just looks like a mess. Space them out too much and it looks too baron. Granted, I’m putting these things in front of some fantastic video game boxes that I spent WAY too much time figuring out how to properly organize, so I also have to take them into account from a visual standpoint, and the ability to actually get the games off the shelves when I need to without too many issues. I wanted to strike a good balance, so I went with 6 per shelf.
Actually, hold on.
Okay, it’s now about 2 hours later and I’ve redone the whole darn thing. I couldn’t shake the feeling that there was still too much covering up the games themselves. I keep having to shift amiibo out of the way every time I want to take a game down for some reason and aren’t the games supposed to be the point? So I knocked it down to 5 per shelf and I think it was the right move.
Of course, this meant I needed to take a bunch of amiibo down, which if I’m being honest, I’m not too broken up about. Sure, I could have just kept them going on down to the floor, but it’s not like you can really see them down there, and I recently got a dog and I’d like to keep them out of her mouth.
It also gave me an opportunity to be a little more thoughtful with what went where. I wanted to keep the Mario stuff top center, Metroid and Kid Icarus top right, and Zelda top left. Metroid and Kid Icarus had to move down a shelf because I wanted to make sure Sonic was in front of the Sega stuff, and Master System needed the most color.
The rest I just sort of grouped in whatever way I could make sense of. I dropped 2 of my Fire Emblem guys because I couldn’t possibly care less about that franchise, and did a shelf of 5 JRPG guys which looks nice.
I have a shelf of realistic Totaku figures, and while Pac-Man deserves the center stage shot way more than Crash Bandicoot does, he works as an excellent buffer next to the totally awesome yet completely wrong size Viewtiful Joe Totaku.
This does leave me in a bit of a spot for future amiibo, but honestly think I can relatively easily pull from the Zelda champions shelf.
This also meant taking down my Chrono Trigger figurines, and I'm not sure exactly what to do about that. Chrono Trigger is one of my all time favorites, and I love those little figurines. I’ll have to figure out a good place for them in the house somewhere. As for the rest of them, I’m confident I’ll find a place for them elsewhere.
The only issue I’m having with the amiibo right now is the Atari shelves. Yes, it’s weird to have all these predominantly Nintendo characters standing in front of games they have nothing to do with, but I think it still kinda works. But the Zelda ones in front of the Atari games seem so washed out. I don’t have this problem with any other shelf. It’s just those rainbow Atari games that aren’t working. I’m really not sure what the solution is here. Those Atari games are some of my favorite things in my entire collection, but the way they seem to completely wash out some of my favorite amiibo is a problem I would very much like to find a solution to. I’ll have to keep thinking on it.
Handheld display
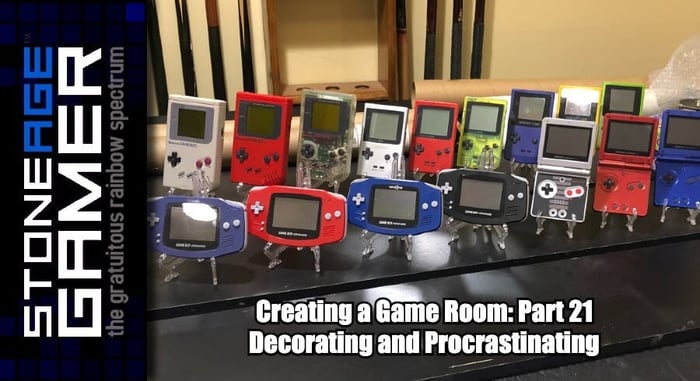
Anyway, The other place that needs my attention is above the CRT and console shelves. This is what I came up with.
I love my handhelds, and while this isn’t all of them, it’s a sizable chunk. The problem is… I kinda hate this?
When I had the idea, I went online and bought a bunch of those little stands for cheap, installed the floating shelves that I’ve had in my garage for years, and almost immediately decided it wasn’t right. I spent time trying to line up colors to make them all match, but there’s something that isn't adding up for me here.
I have a couple of ideas, but I keep landing on somehow displaying the handhelds in some sort of attractive yet grabbable manner. Possibly some sort of peg system where I can keep the systems lined up but not on a shelf? Like, somehow fastening them all to the wall in a way that allows me to grab the one I want easily, but also that looks super cool? I don’t know. It needs work. There’s a good display here somewhere, and I’m going to figure it out darn it!
So for now this is going to have to do. The next step is a big one, and I have a feeling it’s going to work out great. If all goes according to plan, this closet is about to become my favorite spot in my whole house.
The Game Room story so far
Creating a Game Room: Part 23 - Filling in the Gaps
Creating a Game Room: Part 22 - The Closet Conundrum
Creating a Game Room: Part 21 - Decorating and Procrastinating
Creating a Game Room: Part 20 - Console Consolidation
Creating a Game Room: Part 19 - So Long, Temporary Solutions!
Creating a Game Room: Part 18 - And Everything Inbetween
Creating a Game Room: Part 17 - Atari to Xbox
Creating a Game Room: Part 16 - Making Nintendo Look Good
Creating a Game Room: Part 15 - Overdoing it on Organizing
Creating a Game Room: Part 14 - At Long Last, SHELVES
Creating a Game Room: Part 13 - Adventures in Consolidation
Creating a Game Room: Part 12 - On the Blink
Creating a Game Room: Part 11 - Reclamation at Last
Creating a Game Room: Part 10 - Paint it Black
Creating a Game Room: Part 9 - Inspiration From Above
Creating a Game Room: Part 8 - A Nice Place to Sit
Creating a Game Room: Part 7 - Two Steps Forward…
Creating a Game Room: Part 6 - Love (HDMI) Connection
Creating a Game Room: Part 5 - CRTs are Heavy
Creating a Game Room: Part 4 - Arcade Dreams
Creating a Game Room: Part 3 - Shelf-Satisfaction
Creating a Game Room: Part 2 - Organization is Key


