TerraOnion MODE Overview
MODE, or Multi ODE, is the ultimate accessory for you Sega Dreamcast, Sega Saturn, or Sony PlayStation. With MODE installed, you can use your personal backups instead of your aging discs to experience your library of games on your original hardware! In this video, we take a look at what's in the box, go over the basics of installing one in your Dreamcast, and look at our Mounting Bracket and SATA Adapter Mounting Kit.
Purchase MODE here
MODE Mounting Brackets
MODE M2 SATA Adapter for Dreamcast
MODE M2 SATA Adapter for Saturn
Transcript of the video:
Let's talk about disk based systems. If you're here, you probably know what a flash cart is. But for those uninitiated, a flash cart is a cartridge that holds all of your legally obtained backups so that you don't have to swap cartridges out in your systems and you're not running anything through replicators. You're just using those backups on your original hardware. It's a great way to preserve your games and run homebrews and stuff like that on original hardware. But disk based systems are kind of a different animal because you can't exactly take a disk and backup all your stuff on this non rewritable format. So people have been creating for these disk based platforms is something called an ODE or ODE, it works kind of like the CD or GD file or whatever based equivalent to a flash cart. And this is especially cool because well, let's say your Dreamcast sounds like mine.
Yeah, it's not supposed to sound like that, and that's kind of a common problem with disk based hardware, is that eventually it does start to sound like a jet engine or whatever that sound was, I don't know, like a cat lives inside of there or something. That's a little strange, but either way, your disc based hardware is eventually going to break down. It's just kind of the nature of the beast. And even the disks themselves are not built to stand the test of time. Like like these guys here, these Sega CD ones. These are going to cook before these Genesis ones will. That's just kind of the nature of the way these things work.
So what do we do about that? We have ODEs. And what we're going to talk about today is this guy right here. This is MODE, a multi ODE, and it works on multiple systems. It's Built to work with your Sega Saturn, Sega Dreamcast. It's even built to work with a Sony PlayStation, which is super cool but involves a bit of installation. So we're going to talk about breaking down what this does, how you can make it work, how you make it work for you, and some other fun things that we have at Stone Age Gamer that make this even cooler than it is out of the box. Let's take a look.
OK, so let's have a look at MODE, this is the box, this is what will show up in the mail. This is what you get when you order the MODE multi ODE. As you can see on the box itself, it's designed for the Saturn, it's designed for the Dreamcast. And since its launch, they have added PlayStation one support. We're going to focus mostly on Dreamcast support for the purposes of this video just because well, I'll be installing this myself and I am not a very tech savvy person when it comes to installing things. And apparently the Dreamcast is the easiest one to to do the installation for. The Saturn itself as a kind of notoriously complicated game system. And the installation for the PlayStation is, just because of the nature of that console, is a bit more complex. That's the kind of thing that we recommend our upgrading service for. And yes, we do offer a upgrading service.
I'm going to show you what's in this box and all that jazz. But if any of this stuff starts to look a little too complicated for you, like it does for me, most of the time you can send your system into us and we will install MODE for you. And we'll we'll talk about that more in a bit. Let's see what's in this box to crack this sucker open.
So it comes in this neat little slidey open box. I like that. We're just gonna pull this off here and here is that we're going to keep that right there. So it looks pretty. So you always know what we're talking about. MODE. All right. So here's a little cardboard box. Let's see what's inside you. It's a fun piece of paper. This is an important piece of paper. This piece of paper is going to talk to you about making sure you're following instructions, how to identify which type of unit you have, because there's multiple kinds of Saturns out there and stuff. And then this also gives you the link to where you can download the instructions, which I'm going to go ahead and assume are very important. I haven't installed one of these things yet, but I don't think it's as easy as plugging in an EverDrive. So this is an important piece of paper, lots of good information I'll set that aside right now.
And we're going to see what's in the box. And you have these cute little feet. We're going to get to more more about these in a bit. So let's put these aside for now. And you have this this wire, which I'm sure is very important. But as I said before, I don't know what I'm doing, so I don't know what this does. But I'll find out when I download the instructions. And then we have let's get this out of the way and get to the MODE. This is the thing. This is the doodad itself, the MODE. Here it is. I'm not 100% sure what I'm looking at here. I know it's coming in one of these nice little static free bags, which is great. It looks like a circuit board to me. I can see that it has a switch on here. It's got this is where your SD card goes. And we're also going to talk about that a little bit. But this is it. This is all your little things to plug in for all your different options for which system you're going to use.
Now, out of the box, you have an SD card. We've loaded it up with the your legal backups and you just want to let this thing run out of the box. You can do that. But we here at Stone Age Gamer have come up with a couple of quality of life things that we think make the overall experience much better. So let's start with the feet. OK, so these are the feet that we looked at earlier and we've got a couple of screws in there, too, but we'll get to that later. So what these do is these plug into these that wire the way these plug into these little holes here and these little holes will be full of these guys and then you just kind of rest it inside of your system and it functions. It's nice, but it's not the most sturdy thing in the world, especially if it's the kind of thing you're going to move around, because these are just these little things that plug in there.
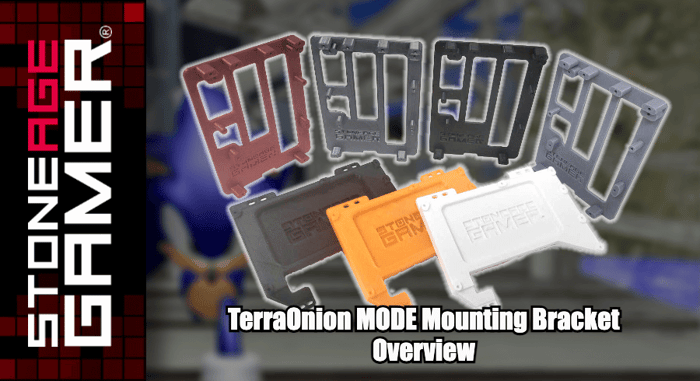
So what we did was we created and I'll show off this one first. This is the black one because I'll be installing in a black Dreamcast. This is our 3D printed mount. This is a bracket that'll hold mode in place. You see, they got the screw holes that line up with your mode so that you can screw it in place. And this will keep everything nice and sturdy, won't move around one little bit. And this is available in a lot of different colors. This is like I said, there's the black one that I'm going to be using for my black Dreamcast. That sounds like it's full of a drunk mouse who's having a bad day. Hopefully when we're done installing this, that will no longer be the case. This is the white version, which is probably what most people's Dreamcast look like, my white one is a bit more yellow than this, because, I don't know, it's old, but this is a this is the situation for mounts or brackets for your Dreamcast. We also have them for the Saturn. Look over here. These are the Saturn ones.
Now, I've never cracked open a Saturn myself, so I don't know all the ins and outs of what makes this tick. But I know that there are a couple of different versions of the Saturn and the different mounts will work for different Saturns. These little feet break out, comes with the screws, everything that you'll need to get them in place, as well as a link to instructions so you can identify which Saturn you have and which bracket you'll need to use and how you'll need to use it, et cetera, et cetera. And that's that's kind of the breakdown of our brackets and pretty nice. Now, the other thing we want to talk about is memory access.
So like I pointed out before on the MODE, this is right over here. This is your SD card slot right here. So you're going to put your SD card in there, but then the MODE is going to sit inside your system. And this isn't really accessible. Now, you're not going to be taking this in and out over and over again. But what happens if there's a new homebrew game you want to try out? Or if somebody just dumps something on the Internet that you want to try, you want to be able to have access to these different things. You want to be able to get more things in and out of your mode, especially if you want to use it on more than one system. So what we did was we created something that'll help you use one of these a little bit better.
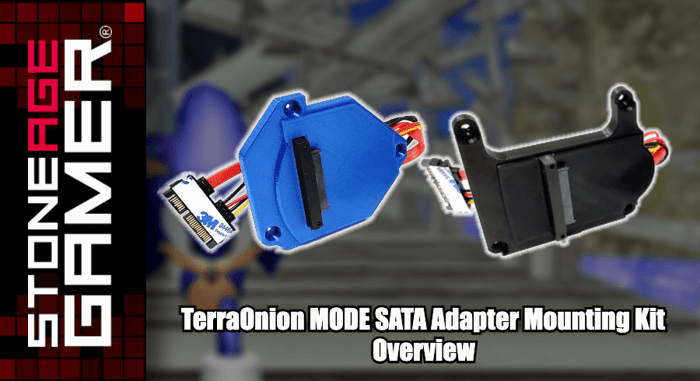
This is an M2 solid state drive, and we've created these brackets like this that will allow easier access to set a unit. So I'm going to show you what's inside of here. Basically, there are two. This M2 adapter only works with SATA type drives. Now, the other popular M2 type is in the NVMe drives. The the SATA adapter will work with the other two and a half inch drives, but you won't be able to close the lid when you're doing so. So basically this is designed to make this kind of drive pretty well seamless in your system. And you can see it here, this really cool blue bit here. This is what's going to sit outside of your system. And this basically allows you to plug in here instead of digging down into your system to gain access to your your memory port, which is pretty darn nice.
And this is what's inside the box. You get this thing which, you know, doesn't need to be blue. They sent me a blue one, which I think is going to look super cool inside my black system. But again, this is 3D printed and designed by us. So we can kind of work with you there on colors. We have got this little circuit board that makes it work, comes with a handy dandy screwdriver. And I will look forward to learning what how this is installed later today. And then there's this guy which comes with it as well. This allows you to plug your your drive right into this guy and USB it to your computer. So it's very easy to connect and trade information back and forth from your PC.
This is the let's see, this is the Dreamcast flavor. And obviously we do have a Saturn one as well. If you want to take a quick look at this on this out of the way, this is the Saturn one. Well, that's how you open boxes hot. And this one is solid black, like most Saturns are the same little extra accessories there to make everything work. But yeah, this will just sit inside your system and you can close your lid with your awesome little M2 to drive. And that is the long and the short of it. That's how these guys that's how these guys look. All right. So we've got all our parts lined up here. We've got our accessories. We've got pretty much everything we need to not only make mode work, but to make MODE sing inside my Dreamcast. So I'm going to attempt to put this thing together and then we're going to take a look at how it actually works once it's installed. Here we go.
All right. So let's get a little bit of prep work out of the way. First things first. We want to get my hard drive set up. So this is the solid state drive. But I got. All right. And we're going to have to format this on my computer. And we're going to do that by using these wonderful pieces that we got in our kit, our adapter kit. That's that's this thing. So this is how it's going to connect to the system itself. First, we're going to take our hard drive here and we are going to connect it to this bit here. See this kind of matches up here. There's really only one way for this to fit. So you're going to kind of stuff it right in there, and as you can see, it sticks up like this, which is normal, which is what this screwdriver is for. We're going to take this screw out here. You do? Oh, hi there. I've used screwdrivers before. Have I mentioned that I am not a console service tech. I am an amateur at best. So what you are seeing now is somebody who really doesn't know much about anything putting this together. So if I can successfully do this, then anyone can. But if at any point you are too uncomfortable to actually do this yourself, like I said, we offer a upgrading service and this is a tiny little screw and I am already having trouble with it.
So we're going to do it this way. This will screw is going to hold your little hard drive in place we go. Success is mine. OK, so we've screwed it down, we're holding the hard drive in place with that. Now, this is not going anywhere. This is going to kind of be more or less what is movable to and from your system. So it's going to plug into this guy once it's attached to your console right now to get it formatted, we're going to use this handy dandy adapter that comes with your purchase and we're going to stuff it in there. And this is going to connect to your USB however you want to do it into your computer and then you can format this to EXfat and then load your games onto it. Following the instructions. I do have a laptop on the side here, just so everybody knows. Full disclosure that has all the instructions on it over here. I'm just going to be following the instructions that you have access to when you buy this stuff. So this is pretty much prepped and ready to roll.
I think the next thing we're going to need to do is the bracket and the mode itself. OK, let the nervousness commence. Here is my black Sega Sports Dreamcast, which I love, and we are going to crack the sucker open. And now we have this. Let's remove the top. Oh, look, there it goes. And let's see if there's actually a drunken mouse living in here. Let's see if we actually have creatures that are making that horrible noise. And it just looks like a Dreamcast. Look at that. That's the inside of a Dreamcast lid. I've never seen one before. Interesting. All right, I'm going to place this off to the side and get to work here. All right. Remove three screws, securing disk drive, keep screws for modem out. That's this guy right over here. Here's our moment. So we're going to get rid of the disk drive. And the next step is using the screws from the disk drive to secure the mat. So I'm going to turn this this way, which is what it looks like in the picture. I'm going to take my mode mount, which is this and let's see, put it in like so. Oh, wow. That really does fit right in there, doesn't it. What could you. OK, so we have the bracket in place. Next up is install mode, carefully plug mode onto white connector.
All right. Here is Mode. Here you are. Let's get it out of the bag. Cat's out of the bag. MODE's out of the bag. This is a kind of a tight fit, but that this fits like a glove. Let's be careful getting out of this super cool anti-static bag and go, come on out. We can do it. All right. We have done it. Mode is out and I'm supposed to connect. Wow. This really is that easy, isn't it? Carefully connect. What does that you think it's you? Wow, look at that. All right, so we're going to line this white thing up to this white thing and plug it in and see how it works. And I mean, that seems pretty snug. Wow, that just sits right in place, doesn't it? Hey, good job, Stone Age Gamer, huh? Look at that. Wow. This is this is certainly a thing.
OK, so now carefully install the four included screws to secure the mode, the four. And that's this cute little baggie right here for including screws. OK, that's four screws that is load attached to my Dreamcast. Look at that. OK, so I guess the next thing to do, let's see, insert your media or use or USB and replace the top case screws and modem enjoy. But we're not quite ready to do that yet because we still have to install this thingamajig. OK, so according to the instructions, this part is going to connect to this guy right here. So we're going to flip this over and it says flip it over place into SSD amount and install three included screws. So here's our mount and we're just going to put this right in here like so and then we aren't going to install the screws. Look at you, that pretty snazzy look, so you look at that, her name. OK, so here is MODE. Let's see if I can follow the picture here. This is supposed to go OK. I have this backwards. All right. Let's face it, like this. And then this is how it goes on top. So the extension cable goes like this maybe. Do I have this right? Oh, it looks like it fits. Oh, boy, it's quite nice. All right, cool. We should be pretty good to go here. So let's let's put this back together and see if we did this right.
OK, we've got it all screwed back together again. Hoping I did that right. Now it's time to install the the hard drive. Right. I think it's time to plop that sucker in there and see how it works. So ensure the switch on the M2 adapter is set to NGFF. All right. Well, let's open this up and see how it looks. Looks pretty darn cool. So we're going to take this off of my a little plug here and we're going to plug this into this guy. Looks like so right. There's the small side. Just kind of slide this right in there. Boy, it's a little nerve racking. Not going to lie. There goes oh, that fits in nice and snug. OK. It's sitting there and now I want to make sure. Right, insert your adapter with your drive installed, ensure the switch is set to NGFF, which it appears to be cool and enjoy. Well, there we have it. It seems to be installed. Look at that. The lid closes. Wow. This is snazzy. Moment of truth. It's time to plug this in and see what happens.
All right. I have plugged my Dreamcast back in. It's back in my little entertainment center here. Modems installed. I loaded my hard drive with a game called Xenocider. It is a homebrew game that we bought just for the purposes of showing off the the the mode working in my Dreamcast. So let's see, have I accomplished what I set out to do? Does this work? Ho, ho, ho, ho, ho. That looks like a functioning Dreamcast to me, and it doesn't sound like it's dying either. There is no horrible screeching noise. All right. So here we are putting up the upgrade menu and there it is mode. Look at that.
All right. So there is Xenocider. I formatted this properly, which is good. No, followed all the instructions and everything went great. So. Oh, look at this. On the on the controller, on the VM. You look at that mode. All right. So let's go ahead and try the inside or out. Let's see how this functions. So if the game it goes right back to the start up sequence. Dreamcast is a silent as silent can be, which is really quite nice. Not really. That's pretty funny stuff. No. One other one other thing I'll say. Let's let's go ahead and restart the unit here just for looking out at the menu again, just seeing what the MODE can do now that I know that it's not going to explode. So MODE can do a whole bunch of extra stuff that I haven't really set it up to do here. But I know you can organize your files and a bunch of different ways. You can show off things like cover art for once you get your library all in there nice and nice and pretty like. So there's really a lot that you can do to make this look nice. Let's see what our options are. Game list mode. Look at all this stuff fast to boot. So, yeah, there's a whole lot of neat things that you can do with your your mode plugged into your Dreamcast or Saturn or PlayStation and. Well there you have it. That's Mode. Mode from Terra is available at Stoneage Gamer Dotcom as well as an array of Brackets adapters, installation services and more. Thanks for watching, everybody. If you liked what you saw here today, please comment like and subscribe. Let us know what your Dreamcast sounds like when you turn it on. Does a small mouse live inside yours like it clearly did mine? Who knows? We want to hear from you on behalf of everyone here at Stone Age Gamer, keep playing games. [00:00:06][0.0]