null

Retro Gem Universal HDMI Upscaler Kit - PixelFX

€104.13
(7 reviews) Write a Review
WIN $300 FOR WRITING A REVIEW! LEARN MORE
SKU:
SAGRETROGEM
Retro Gem Universal HDMI Upscaler Kit - PixelFX
Expected release date is May 1st 2025
Pre-order shipping estimates are not a guarantee. Pre-orders are charged in full during check out, however pre-orders may be cancelled anytime before product ships for a full refund.
PRE-ORDER DELAYED SHIPPING NOTICE: When combining in-stock products and pre-ordered products in the same order your order will be held until all items are in-stock. If you do not want your order held then please place separate orders for in-stock and pre-ordered products.

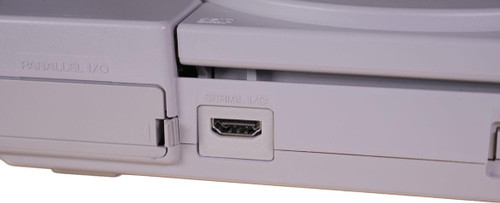
Retro Gem Universal HDMI Upscaler Kit for PlayStation, PlayStation 2, Nintendo 64, Dreamcast - PixelFX

Successor to N64 Digital, PS1 Digital and DC Digital.

The Retro GEM is the ultimate HDMI kit for your retro gaming consoles.

  • Digital lag-free HDMI output
  • Simple firmware update procedure via WiFi
  • Advanced scaling and video filters in Shiny Edition

Current Console Support:

  • Nintendo 64
  • Sony PlayStation
  • Sony PlayStation 2
  • Sega Dreamcast
  • More Coming Soon

Differences between G.E.M. and G.E.M. Shiny Edition

Please click here for specific mainboard revision compatibility. 

The Retro GEM must be soldered into your gaming console. These upgrades are advanced and require a high level of soldering skill. Never soldered before, do not fret! We have an installation service that includes the hardware HERE.

The basic can be upgraded to the Shiny at any time, even after installing into a console.  License upgrades can be purchased here

Please see the Retro GEM documentation to learn more.

One flex cable is included in the console kit, but sometimes mishaps happen during the install and an extra flex will give you a second attempt.  Extra kits available by request (email [email protected])

  • G.E.M Basic Vs G.E.M. Shiny

    Successor to N64 Digital, PS1 Digital and DC Digital.

    The Retro GEM is the ultimate HDMI kit for your retro gaming consoles.

    • Digital lag-free HDMI output
    • Simple firmware update procedure via WiFi
    • Advanced scaling and video filters in Shiny Edition

    Current Console Support:

    • Nintendo 64
    • Sony PlayStation
    • Sony PlayStation 2
    • Sega Dreamcast
    • More Coming Soon 

    Differences between G.E.M. and G.E.M. Shiny Edition 

    Please click here for specific mainboard revision compatibility.  

    The Retro GEM must be soldered into your gaming console. These upgrades are advanced and require a high level of soldering skill. Never soldered before, do not fret! We have recommended installers that can do the upgrade for you.

    The basic can be upgraded to the Shiny at any time, even after installing into a console.  License upgrades can be purchased here

    Please see the Retro GEM documentation to learn more.

    The optional spare flex isn't required and is already included in the console kit. But sometimes mishaps happen during the install and an extra flex will give you a second attempt.

    Each console kit is priced differently and will be available for purchase separately in the future. They are priced differently as each console can have varying specific setups. 

    • G.E.M Basic Vs G.E.M. Shiny

      FEATURES RETRO G.E.M. RETRO G.E.M. SHINY
      Output    
      Direct Mode               X                X
      -up to 480p               X                X
      -up to 720p               X                X
      -up to 1080p                              X
      -up to 1440p                  X
      De-interlacer    
      Bob                X                X
      Weave                  X
      Motion Adaptive                  X
      Scaler    
      Integer                X                X
      Free/Custom                X                X
      Retro FX    

      Basic Scanlines


                     X

                     X

7 Reviews

  • 5
    Good with room for improvement

    Posted by Samson Wick on Apr 17th 2025

    For this review I installed the RetroGem into a SCPH-70012 Slim PS2

    Packaging 10/10
    As usual SAG did a great job packing for maximum safety. There was no chance of the kit getting damaged in transit. What arrives is an anti-static bag with the RetroGem, a plastic baggie with screws and bits, and a cash envelope containing the ribbon cables. That`s a great way to keep the cables from getting kinked during transit.

    Documentation 6/10
    The documentation is all online. The envelope has a QR code on it that takes you straight to the Support page on PixelFX`s site. The link isn`t specific to the configuration you ordered.

    The documentation definitely needs work.

    For the PS2 Slim, there are 4 major variations in installation, and these variations are woven into a single web page with collapsable sections. It is legitimately confusing to navigate. What`s worse, if you click on any of the images to see the full detail it loads a new page in the same tab. Any use of the back button, will take you all the way back to the PS2 slim page with all of the sections collapsed forcing you to navigate the labyrinth over and over if you want to check or re-check your work.

    The section on installing the main ribbon is particularly unintuitive. The section has images inline of everything except the components that need to be removed around the video chip and the tap points for 3.3v and 5v. For that you have to click on linked text.

    There are several items that aren`t documented at all - I had to refer to Tito`s video as the official PixelFX install video does not cover the SCPH-70012. For instance, the 5v and 3.3v points aren`t indicated on the ribbon cable itself, and there`s no mention at all of connecting the reset line.

    This would be much cleaner and much easier to follow if they had created separate documentation for each of the four variations.


    Difficulty Level 5/10
    While this is definitely not beginner level, it`s also a fairly easy install if you take a couple of steps.
    - Read the documentation like three times, make sure you understand it before you get started
    - Use a microscope if you have one. I`ve done many similar installs without a scope, but the scope makes it way easier.
    - Use leaded solder. If you`re concerned about mixing leaded and non-leaded, then remove the old solder first. It`s totally worth the effort and will give you a much better result.

    The most difficulty I had with this install was the flex-cable ``origami``. It would frankly have been easier to use bare wires to connect the audio, controller and reset points, but the result wouldn`t look as clean. It was difficult to properly judge where to bend the flex cables, and it`s tricky to install them at odd angles before they`re bent.


    Support Quality 10/10
    I bought this through SAG to take advantage of some points I had laying around. When I discovered that the RetroGem I was sent had Basic firmware on it although the bag it came in said ``Shiny``, I had to wait until business hours on Monday to get the issue resolved. When I reached out to PixelFx on their Discord, they told me I would need to go through SAG for help with that. To their credit SAG got to my request first thing Monday morning, and by that afternoon I had the proper firmware installed. It was kind of annoying that this happened in the first place, but SAG assured me they haven`t had this problem before (usually the marking on the bag matches the installed firmware) and were great about the whole thing. Also, if I had known that PixelFx marked the bags and it was therefore their mistake and not SAG`s, I may have been more successful getting help on the PixelFX Discord over the weekend.

    What was Great
    - Just like citrus3000psi and woozle`s previous HDMI output mods, the features and functionality of the RetroGem are excellent. The PS2 analog video output has always looked muddy and dingy to me, even when output as component video to a high quality scaler. This device provides a bright and clear image, seamlessly handles resolution switches, and has multiple options for tweaking the image.
    - Once you get past the clunky documentation, the installation is actually pretty simple, and the design is well thought out.
    - SAG shipped my RetroGem really fast and it arrived well protected and in perfect shape (minus the wrong firmware which was not their fault).
    - CEC - being able to control the upgrade via your TV remote is really cool.


    What Could Be Improved
    - Better documentation - see above for detail.
    - Purpose made flex cables - the required cable origami could be significantly cut down by simply making different flex cables for different PS2 Slim variants rather than using the same set for all of them.
    - I really wish this upgrade could improve the analog video output the way the Wii Dual did.

    Conclusion
    This upgrade was fun to install and even clocking in around $200 it is the best and most inexpensive way to attach a PS2 to a modern TV.

  • 5
    Best internal upscaler upgrade I`ve ever installed.

    Posted by Alex Jimenez on Dec 21st 2024

    PixelFX RetroGem is very straightforward and team at PixelFX are very supportive.

    Pros:
    - There how-to are easy to access and organized for the correct console you`re planning to install this on.
    - Kit provide the 3D printed parts and screw bits for the console you plan to install it on. (Only 3D printed parts for the upscaler that is.)
    - how-to is easy to understand.
    - RetroGems UI is a blast to experiment with, It has so many settings, if connected to Wi-Fi you also have an interface on your phone to monitor or tweak settings remotely, and if you have the Gold edition you can upscale to 1440p.
    - video quality is very crisp and clear, possibly the best output you would get on your system.
    Cons:
    - It`s not mentioned but there is a possibility you might receive fatal errors when the RetroGem is connected to HDMI switcher or splitter so keep that in mind, It`s best to connect a device directly to the screen or HDTV in question.
    - PixelFX doesn`t have complete STL files for some 3D printed parts in there how-to so if you lose some of those parts you might have to ask for replacement or start searching up for the STL file on google but if you ask PixelFX directly they might send you the STL file or link you to it, overall just a small pet peeve but I feel that they should add more 3D printed files to their how-to for their consoles for any 3D printer enthusiast.

    Overall I thoroughly enjoy this upscaler upgrade and would recommend it to any one willing to push the boundaries of their retro console.

  • 5
    PS2 500001 Shiny Edition

    Posted by Glenn on Aug 29th 2024

    Always happy with the RetroGem. StoneAge Gamer shipped the next business day from Ohio, I received the shipment in 7 days. Installation for this is really a test of skill/patience. The solder points are extremely small but with a microscope and fine soldering tip I was able to achieve great success. A fun project, and a great way to get that CRT vibe from older consoles.

  • 5
    Retro Gem

    Posted by Kat on Aug 24th 2024

    Have one in my PS1/PS2/Dreamcast, they are amazing.

  • 5
    retro gem hdmi

    Posted by Reviewer on Aug 19th 2024

    Fantastic product

  • 5
    Best quality video you can get on N64

    Posted by don on Aug 19th 2024

    While this isn`t a upgrade everyone can do easily with the very fine solder pitch, you are hard pressed to find a better signal and image quality out of your console than this upgrade. For consoles with no native RGB and built in blur like N64, this is a must have.

  • 5
    Retro gem ps2 fat

    Posted by Bruse D atkin on Aug 2nd 2024

    This thing is a game changer for rentro gaming! Super technical install, but 100% worth it! Will be upgrading to shiny in the future!