PlayStation Replacement Console Shell Overview
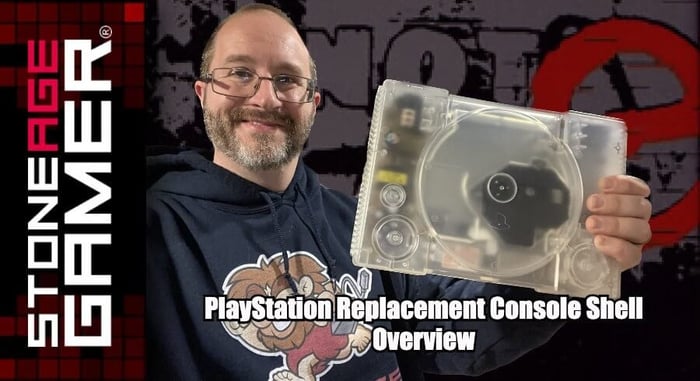
Make your original PlayStation console look cooler than ever with these replacement shells.
Grab yours here: https://sag.rocks/3YT5X49
Transcript of the video:
Hi, everyone. Kris from Stone Age Gamer here. And this is a Sony PlayStation. It's one of the most iconic video game systems ever created. It's got an incredibly timeless design. It looks awesome no matter how you slice it. I love this thing. So how do you make something like this look even cooler? You do what you do to any video game system. You make it clear this is a replacement shelf for a Sony PlayStation and we carry them here at Stone Age gamer. Let's take a look.
[00:00:30] All right, Here we are. Let's first things first. Let's take a look at what this thing is. What's in the box. We got this, a nice little box that this comes in. We're going to crack this open and here is our shell. We're going to be applying a clear shell to a PlayStation today. I'll go ahead and put this box aside and let's see what we've got cooking in here. It's just sealed with some tape. And actually, it's not a tape. It's one of those little circle seal things. Isn't that spiffy? All right. So we have a it's an empty PlayStation and we've got a couple of screws in here. I'm looking forward to finding out what those are for, but they're just regular Phillips head screws, which is why I have my regular Phillips head screwdriver here ready to rock and roll. And I guess let's let's get to work here. Now, I cannot stress enough I am an amateur. So what you're going to see here is just me taking this thing apart and trying my best to do it for the very first time. I am not a professional in any of this stuff, so I guess your mileage may vary. If you are a pro, you'll probably be able to do this a lot faster than me. I'm just going to see if this is as straightforward as it looks.
[00:01:42] So let's see. I'm not entirely sure what these screws are for. I'm going to have to assume that I'm going to need to reuse the screws in my actual PlayStation because this is just, you know, it's not connected and it takes more than two little tiny screws to keep this thing in place. So I'm going to go ahead and assume that I'm going to need to do that with my system. I'll just take the old screws and put them into this new shell here. But it's it doesn't seem all that complicated. There aren't a lot of moving parts. I feel like I need to disassemble. So I guess let's take a look now, before we get started proper. There is one thing I want to point out. This is specifically designed for PlayStations that look like this. Any of the models that look like this. So as long as it doesn't have this business going on in the back, the wires and stuff, this one, this shell is not designed to work with this model, a PlayStation. It's just doesn't have the cut out here. And I don't know, there might be something else internal, but either way, it's designed to work with guys that look like this.
[00:02:44] So this is the system that I'll be taking apart today and to see if I can make this all work. So here we go. Kick it. It's all in the mike. Okay, That's the last screw right there. They all seem to be the same. So just out of there. Over there. Let's see if this comes apart as easily as this shell does. Let's go ahead and turn it upside down and lift and look at that top comes off just like that. Really not much to it. So I think what I'm going to do is I'm going to take this top and I'm going to put it on here. It looks like a little serial oil thing and it just comes right off. Well, so just here so I'm just going to put this right on top where the other one was, and I'm going to do it like this. Right? So now I'm going to take this and turn it upside down and see if I can't pull the bottom off. There's no way this is going to work. The bottom is probably at the bottom is attached. What am I what am I doing? What am I doing besides flopping the all the disc drive around like that, like a goober. All right, so for everybody who actually knows what they're doing, don't do what I just did, which was turn the whole thing upside down because this is attached. Okay? Because why wouldn't it be? And, you know, this isn't attached. This actually just kind of rubber rubbery to on there.
[00:04:07] So let's let's not do what I just did and let's let's get all the little screws off of here and then we'll just try to place them right back into here the way we found them. I'm just going to do a transfer 1 to 1. Everything seems to be laid out the same way, so I'm just going to unscrew all the screws that I can see, and I'm just going to try and pick this up and put it right on there exactly the way I found it. All right, let's go. Wish me luck. Okay. So what I just learned is you do have to separate the disk drive. You do have to separate this thing because you need to get this shielding off here in order to get to this guy. And so you have to on. Listen, listen up these screws up top here, and then this guy can come out. So now that we have that, I'm just gonna replace this here and we're going to put this back together exactly the way we found it. Wish me luck.
[00:05:07] Okay, I am reasonably confident that I put everything back where I found it. I guess we'll find out if it turns out when I'm done with it. But right now we're going to apply the lid and it should. If you put it on correctly, it should just attach just like the original does. Take it. That fits like a glove. All right. Well, put the screws back in the bottom here real quick. And away we go. I'll kick, kick. All right. And we have done it. There is the PlayStation. Let's get our little parallel port on the side here. And let's get our little flippy do back on here. And tada! And there it is. There is our clear shelled PlayStation, which looks cool as heck or works, and everything just kind of fit right back into place. And that is all there is to it. That is how you make your PlayStation look mighty fine. Obviously, you want to do a good job of paying attention to where all the various screws came out of to make sure you're putting them back where they belong. But other than that, this was a pretty straightforward and easy process. And that's it.
[00:06:21] And there you have it. There's the clear shell applied to an original Sony PlayStation. One thing I didn't notice until I turned this on just to make sure I didn't screw anything up, was that you can see the disc spinning around inside. I didn't even think about that. It looks incredibly cool. So there you go. That's the clear shell for the PlayStation. Now, I did want to point out that I am not the console service tech at Stone Age gamer. So if you are afraid that if you send in your system, I'm going to be touching it's doing this stuff. Don't worry about it. I am not the guy that touches any of the game systems that come in for console upgrades. The point of this video is to show that this is a pretty straightforward process that even I can do it without messing it up. And if I can do it, you can do it. Anybody can do it. This is not a complicated shell to take apart, put back together. You got to pay attention to a few things like you saw in the video. I made a few mistakes, but as long as you're careful, this thing still works just fine as soon as I turn it on. So there you go. And that's it. Thanks for watching, everybody. If you like what you saw here today, please follow comment like subscribe, share and get down in the comments and let us know what other systems you think you would like to see. Clear shells applied to or even what other colors would you like to see? The PlayStation. And I think this would look awesome in blue, and I'm pretty sure that exists. I don't know, off the top of my head if we have that one, but I hope we do because it's super cool. Anyway, thanks again for watching everybody. On behalf of all of us here at Stone Age, Gamer, keep playing games.


