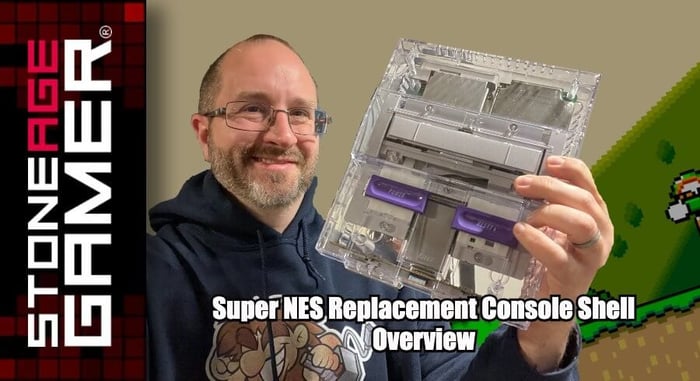
Super NES Replacement Console Shell Overview
Is your Super NES yellowed, cracked, or otherwise not all that attractive-looking anymore? These new Super NES replacement console shells can make your system look even better than new. Here's a look at how they work.
Grab yours here: https://sag.rocks/3RI9ZYt
Security bits available here: https://sag.rocks/3RI9ZYt
Transcript of the video:
Hi, everyone. Kris from Stone Age Gamer here. And if you have a Super Nintendo, there's a better than even chance it looks a little something like this. The Super Nintendo is prone to yellowing, severe, yellowing, sometimes the top, sometimes it's the bottom. It's usually not this part in the middle. Which is weird because I guess it's just made of different plastic, but whatever. Either way, Super Nintendo is they tend to look a little grotty over time. Wouldn't it be super cool if instead of that, your system looked like this Stone Age gamer now carries some clear shells for the Super Nintendo entertainment system? Let's take a look at how they work.
[00:00:37] Okay. Here we are. This is the Super NES shell top. And the bottom comes in this well back here, let's let's take a quick look inside and see what we are, see what we're working with. So here is the crystal clear shell itself is the top, obviously. And then you've got some screws and a super famicom decal. That's pretty snazzy. And we'll go ahead and take the bottom bit out here. There's the bottom tray and move these bags off to the side. And it's really cool looking. I like it. It's a you know, let's go ahead and give it a little test run here, slap it together. And that is a crystal clear looking super s shell. That's a I like it. It's awesome. All right. So let's move this aside and get to the basics of what you're going to need. You're going to need a Philips head screwdriver because the screws that come with this guy are Philips heads. This one is ancient. Sorry about the paint stain, but this one's this an old screwdriver. And then you're going to be one of these guys. This is a security bit. We sell these here at Stone Age Gamer and this will get the security screws in the bottom of your existing Super Nintendo open so that you can, you know, place the sucker on there.
[00:01:50] So let's go ahead and replace this right now. Fits right in the standard screwdrivers. So we're ready to go. And this monster right here is what we're going to be replacing the shell of tada. This is a Super Nintendo that, as you can see, has seen better days. It's so browned on the top, it's missing a chunk out of the corner here. So I figured this was the perfect test, subject to crack open and, you know, take the guts out, put in a new shell and see what works. So let's get started. You know, turn it upside down. Let's go ahead and see what's cooking with this external part. I don't think we're going to need to remove this, but just for Pips and giggles, I'm going to go ahead and put that off to the side. All right. Let's let's do some unscrewing and go. All right, so now that we've got the screws all nice and loose, what we want to do is you want to make sure that these guys are staying on the bottom. So we're just going to kind of hold those in place, pull up a little bit, and now the top has been removed. So put this over to the side. Let's clear out some of the business we got going on down here. These screws we're not really going to need anymore because there are new screws for our fancy new machine here and now we've got the guts that need to go into this system with the exception of the power and reset switches. So I'm going to say we're going to need to get this stuff off of here and attach it to this.
[00:03:27] So if you look side by side here, it looks like it's pretty well set to receive all those various screws right where they show up here. So we're just going to unscrew these guys and plop them right in here and see how that looks. Let's get our trusty Philips head back on and get to work. Okay, we've got all our screws out. This part gets a little tricky. This little arm comes off here. So what we need to take off first is this job right here. This is actually a separate piece. You got these two little Clippy clubs in here. We're just going to kind of press them in so we can pull this bit out here and tada. Now, one thing to notice is that this piece here was holding this this little wiry thing here. This is what's going to make the trapdoor actually function. So when we put this back together, we're going to want to make sure we do that. Then once that little arm came off, there's another screw under here.
[00:04:31] This there is in my system. I don't know if there's different revisions that have different numbers of screws, but we're going to go ahead and unscrew this guy. And we're going to leave him separate. Just so I know, this guy is the first one that goes in and theoretically this should just lift out and it does get a little spring in here that is keeping. There we go. The spring was kind of what, spring loaded the reset button. So now we've got this part taken out. We've got the door flap that's its own little entity. We've got this guy here. This is Super Nintendo on it. And now we just need to take these buttons off, which I don't imagine should be too hard. Looks like they just have little clippy is on them, so let's just try and unclip them here. Is that reset of power? Yeah, reset. I got it right. It's weird looking at it from the other side and we'll take these guys out like. So now this hideous broken shell is ready to be put out to pasture. So let's basically do what we just did in reverse. Okay. Now that we have the buttons in place, there's one thing we need to do. It's a little bit different here. So when you're looking at the top of this guy as opposed to this guy, you see the there's a bit of a structural difference here. These are these flaps at the top of the bottom are not separate pieces on here. They are their own. The thing.
[00:06:04] So what we need to do before we do anything crazy here is we need to get this the flap kind of in place here. Right? So there now the flap is in place. There's a little groove here where the line from the spring is going to go. Now we're going to turn this upside down without dropping anything. And then we are going to place this on top in a way that doesn't make the flap go flop. And where we successful, we were not. Let's try again. Did I do it? I did it. Look at that. All right, let's put this thing back together. Okay? Top of the system seems to be in good working order here. It's time to start working on the bottom. So I'm going to go ahead and put this off to the side. And let's see if the bottom is a little easier than the top was, because what we got to do is just take everything that's in here and drop it in here. So I see a bunch of different screws, but they're all Phillips heads. And so no more security bits in here. And we're just going to I'm just going to unload what I've got and drop it right into there. So let's get the work, shall we? Okay. So here are the innards that I have all removed from its base. I had to take this little doodad off here in the corner to get to another screw that was hiding down there. Because this is a I just so happened to choose my broken super and he is just so happened to be a slightly more complicated flavor of Super Nintendo if I can get this shielding up. There we go.
[00:07:52] See, this is the SNES CPU 01 . You can see it there. This guy here is Rick. It requires a little bit more effort than most Super Nintendo. So most of the systems that you have are probably just going to fit right into these right into these guys. But this this one requires a little bit of extra work. Now, one thing that needs to be pointed out is that you're going to want to remove the shielding from these, which seems counterintuitive, but that's the whole point, is you want to make as much of the innards of the system visible as you can through with this fancy clear shell here. So in order to do that, this controller port thing, you hear this rhythm, rhythm, ribbon cable just comes right out. Not much to it. Once you pull that out, you can take this shielding off right here. And now we have all of this wonderful green chip city goodness showing off here. And we're just going to go in and plug this back in right where we got it, like. So here we go. Make sure that power light's on the left. Okay?
[00:08:57] Now we need to take the shielding off the bottom, because if we don't, it's not going to fit properly in here. So this plate just comes right off, like, so we're going to set that over to the side. And now here is our base. The thing is, there's actually one more piece to the puzzle here, since most Super Nintendo is have a different kind of chipset on the inside, there are a couple little pegs added to this guy here that you need to snap off in order to make it sit properly. It is there's a picture of it on our website. There's one guy here and one guy here. They're just these three each. My players here, just these little tiny peg guys and we're supposed to snap them off. And I am going to hope for the best that I don't. Actually like messing anything up permanently here. So let's see. All right. Moment of truth. I may or may not have screwed this up a couple of times or tried learning how to do this a couple of times before I hit record again. All right, here we go. When I get this little bit going in the back here, this is where all that stuff sits. And now. Oh! Get in there. Voila. It is sitting nice and flat. Look at you. There it is. He's got these two little pegs that sit in this hole here. And now it is sitting nice and firm. Okay, that looks like it is where it belongs.
[00:10:23] Okay, now we can take this and we're going to slip the controller bits right here in the front like so. Here we go. How are that fits over there? And this is sitting pretty. We've got the now we just got to add all the our screws back where we found them. Hoping that I can remember where they all went. Okay, so here we go. Time to add some screws. Okay. Here we are. I have screwed all the bits back in. Couple of things that you're going to want to do that I didn't do thing number one. Before you unscrew anything, you want to jiggle the power handle a little bit. I saw a tutorial online that said that sometimes these systems can hold a little bit of a charge in there. So if you don't just turn the power on for a second just to make sure it runs itself out, you might damage something. Thing number two, keep track of where your screws came from because yeah, I didn't do that. And thing number three, you might want to clean things before you go plopping them back in there because, you know, we're going to put this eject button back in here. But it could stand to be wiped down for sure. But just just for the sake of getting this all put together, this is this is where we're going to sit here. So let's see if we can't figure out how this sits in here, huh? Okay. I figured out the spring. That only took me a minute. All right.
[00:11:42] Now it's a it's a moment of truth time. Let's take the top part that we worked on earlier right here. And we are going to plug her in. Let's see. We're in the off position. We're in off position. Let's get everything lined up. And as long as I did everything correctly, this should work. Once we screw it all in. So let's. Let's screw these bits in and see what happens. And there you have it. There is a clear Super Nintendo. Obviously, like I said, we could have cleaned up the eject button and stuff a little bit more. But for the most part, this looks pretty snazzy, even with just the the minimal amount of effort here. And like I said, most other models of Super Nintendo are going to be a lot easier for you to mess with than this guy was. But you can see all the super cool bits on the inside there.
[00:12:39] Let's see. Does this cute little door still fit on here? It does. We can cover our little expansion port there. Our power button slides on and off our reset button. Scott spring to it. Our cartridge flap works. There it is. The Super Nintendo and its fancy new shell, nice and clear, and we're good to go.
[00:12:58] Now, clearly, I'm not a professional, as you saw in the video, but it was pretty fun to take this thing apart and figure out how it worked. Obviously, other systems are going to be a lot easier than the one that I used. For the most part. If you don't have that CPU zero one model, they're a lot easier to just kind of put in there and clamp back up. But it was still a fun experience and it looks so cool. I love the way this thing looks and there's a smoke one too, that we get from time to time. It's like this, but not like a black ish kind of color. And either way, these things are awesome. And we have them here at Storage Gamer and that is the long and the short of it. Thanks for watching, everybody. If you liked what you saw here, please follow comment, link and subscribe. Let us know what colored shells do you have for your Super Nintendo switch? You get the clear one. Does it look super awesome like this? You get the smoke colored one. Does it look cool next to your smoke? Nintendo 64. I don't know. I think these things are awesome and I love hearing from everybody. So sound off in the comments. Tell your friends. Thanks again, everybody. On behalf of all of us here at Stone Age gamer, keep playing games.


