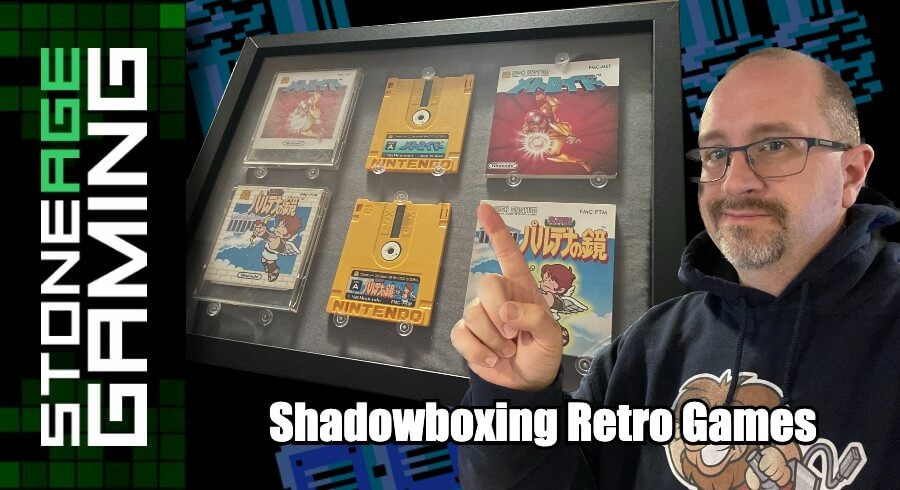
Stone Age Gaming: Shadowboxing Retro Games
Do you have retro games that you'd like to hang on your wall, but you dont' know the best way to do it? Well, this might not be the best, but it's certainly A way, and that's something? Join Kris as he figures out how to make Famicom Disk System games look good in a shadowbox.
Do you like old video game stuff? Check out our site! https://stoneagegamer.com/?afmc=marketing
Transcript of the video:
[00:00:03] Hi everyone. Kris from Stone Age Gamer here and welcome back to Stone Age Gaming, a Show where I get to talk about the wonderful world of collecting video games. Now I want to talk to you about this today. This is a little project that I've been working on. It's a shadow box that's containing some of my old Famicom games. Now, I work for Stone Age Gamer, so obviously I'm familiar with flash carts. I like using flash carts. If I'm going to go back and play NES games, super NES games or even famicom games. I typically do it through a flash carts instead of grabbing the old cartridges off my shelf. Now that doesn't mean I don't still like collecting the stuff because I do. Every single one of these games has some sort of meaning to me. It's why I have them. And the packaging, the instruction manuals, the cartridges themselves. That stuff is what's super interesting to me as far as collecting goes. Now, one of the things I like to do with Japanese games more, you know, I grew up here in North America, so Japanese games don't mean a ton to me, but I like to try and track down ones that have real historical significance to me. So I went on a bit of a trip lately to find like the original Super Mario Brothers, the Famicom two System, The Legend of Zelda, Kid, Icarus, Metroid, that kind of stuff. And I've always wanted a good way to display them. And I occurred to me that Shadow Boxes might be a pretty cool way to do it. So I worked on this project. I'm recording this after I have already done the other ones. So let's go take a look at the video footage of me trying to piece together and figure out how to make Shadow Box work for Famicom Disk system games. Enjoy.
[00:01:29] All right, so here we have a shadow box. I picked this up at Michael's in a 2-pack. They're very nice. And the goal is to get these fellows, these famicom this system games sitting inside nicely and pretty in this shadow box without them falling down, all without doing any damage to these things. We're not gonna use any tape or anything like that to hold these things in place. We're just going to use a couple of thumbtacks, maybe some nails, just something to hold them in position so that they don't, you know, flop forward, fall down, all that jazz. So I have one out already. And what I'm going to do is I'm going to attach to this phone record, right? So they come in these different pieces and I cut this foam core out to fit inside of this, because if we go directly into the back, these things are going to flop forward, right? So the foam core kind of makes it easier for me to put pushpins in. I don't have to nail directly into the backing board. And yeah, that's hopefully going to help hold these things in place that are kind of turning into a bit of a mess.
[00:02:30] So I'm going to use some fabric here. This is actually the fabric that I used to used to be the backdrop for my video. So before we got this nice little tablecloth here and I accidentally strap this one to the backing board itself, which was a terrible idea. It's just not there. It is. I've like five or six attempts at figuring out how to do this. Right. I think I'm finally onto something here. So I'm going to take this off. I'm going to wrap this cloth around this phone core and we're going to put all the games in position. We're going to put the frame together and see how it looks. Here we go. Okay. I have reapplied the fabric from the old backing boards to this foam core. Here. It's flip over and see if it looks okay. Yeah, not. Not bad. Looks relatively flat and shiny and, you know, vaguely professional. Now, the real test. Let's see if it'll fit on that. This. There we go. Now we've got that in place, and now we can start to put the actual games on the board. So I just want to kind of wrap this little fold around here. I don't want any creases coming through. That's looking pretty. Okay. Oh, okay. All right. Looks all right from the back. There we go.
[00:03:52] And all right, so what I want to do is I want to do Metroid across the top. So we're going to do. The box, the disk and the manual. And then we'll do kid Icarus along the bottom just to kind of match. And now we just want to kind of line all this stuff up exactly where we want it to be. Well, it looks pretty. Okay. I want to make sure that we're lining them up on the top. And the bottom is a mascot, a stake that I made in one of my previous attempts at this is, you know, making sure everything lines up on the left to right. And then they were all shifted up towards the top and it looks terrible. So we want to make sure we avoid doing that, get everything exactly where you want it to be ahead of time. Now, what we're going to use to hold these in place, that is the question. So we could use these thumbtacks here and they would probably be the easiest route to just kind of thumbtack these things in place. But these thumbtacks are very obvious and I don't love them. I don't love it being super obvious with holding them in place. So I was thinking I might use some nails. I cut these nails into small bits. The nails are obviously too long to fit inside the glass. So what I wanted doing was I used bolt cutters to cut nails in two thirds, which was a huge pain in the butt. But I did it, so I guess I could check and see if these are going to work.
[00:05:28] Okay. Moment of truth time. I had to pull a couple of audibles there and trim with these guys the nails. They weren't sticking, so we went with the thumbtacks. I think everything's pretty well lined up here. I wasn't able to get the thumbtacks over this, so I just kind of put them underneath these cases. Everything else I was able to kind of hold in place. So I'm going to put the glass on now and we're going to try and close it, close it up and see if this actually works. All right, Moment of truth time. I'm going to stand it up and see what happens. Oh, it works. Oh, it looks great. Oh, hooray. There you go. We did it. We made. We made these disks and instruction manuals. Hang up and look real nice in this frame, and I'm just going to put it up on the wall. I got another couple of disk system games to to frame up, and we're going to hang them over my TV, and. And that'll be that. So there you go. This was a fun, interesting project and a cool way to display some historically significant classic games today.
[00:06:39] It came out very nicely. I did another one right after I finished the one that you saw me on video doing. And I kind of hung up on the wall over there on my television. They look really nice. I'm very happy with the way they came out. I do still need to track down an instruction manual for Donkey Doki Panic, because that's the other one I did. I think the video was of me putting together Metroid and Kid Icarus. The other one has my this system Doki Doki Panic and Legend of Zelda in it, which is really super cool. I just need that last instruction man to fill the extra space. But regardless, the ones that I have there, I keep looking over there like you can see it. That's where the wall that I hang these things up on. I think it looks really great and it's a really cool way of displaying something that has that level of historical significance and they're pretty easy to open up if I ever need to look through those manuals again. It's just kind of like page through because that got such great are working them, but seeing them out and on display, seeing the disks themselves out and on display, seeing as I don't even have a functioning disk system, I just have them for the historical significance, Like this is a really great way to display them and I'm pretty happy with where they came out.
[00:07:39] So that's it. Everyone, thanks for watching. If you liked what you saw here today, please follow comment like subscribe, share and let us know down in the comments. What do you think of what I did? What better way was there to do that? Because I am sure that there is a smarter way to go about doing this than what I did. I made a lot of mistakes during this process, but you know, it was a learning process and I'm really happy with the final results. But I would love to hear from anybody who wants to chime in on really cool and interesting ways to display the games from their past or things of historical significance in ways that really make their homes look nice. So thanks again, everyone. We have all of us here at Stone Age Gamer, keep playing. Games.